
In a world overflowing with discarded electronics, a quiet revolution is taking place in workshops and on kitchen tables. It’s the rise of the toy revivalist, a new breed of parent, hobbyist, and educator who sees potential where others see trash. That beloved talking robot or remote-controlled car, now silent in a dusty corner, represents more than just a broken plaything. It’s an opportunity to learn, a chance to create, and a small but powerful stand against our throwaway culture. The ‘right to repair’ movement has highlighted the growing problem of electronic waste, and fixing toys is a fantastic, accessible entry point into this sustainable mindset. It’s a practical way to save money, reduce landfill burden, and most importantly, teach valuable hands-on skills. This guide is your map to becoming a toy revivalist. We will walk you through assembling your toolkit, understanding essential safety measures, diagnosing common problems, and performing repairs. We will even explore the exciting world of upgrading old toys with new features, turning forgotten friends into enhanced, one-of-a-kind creations.
Assembling your toy revivalist toolkit
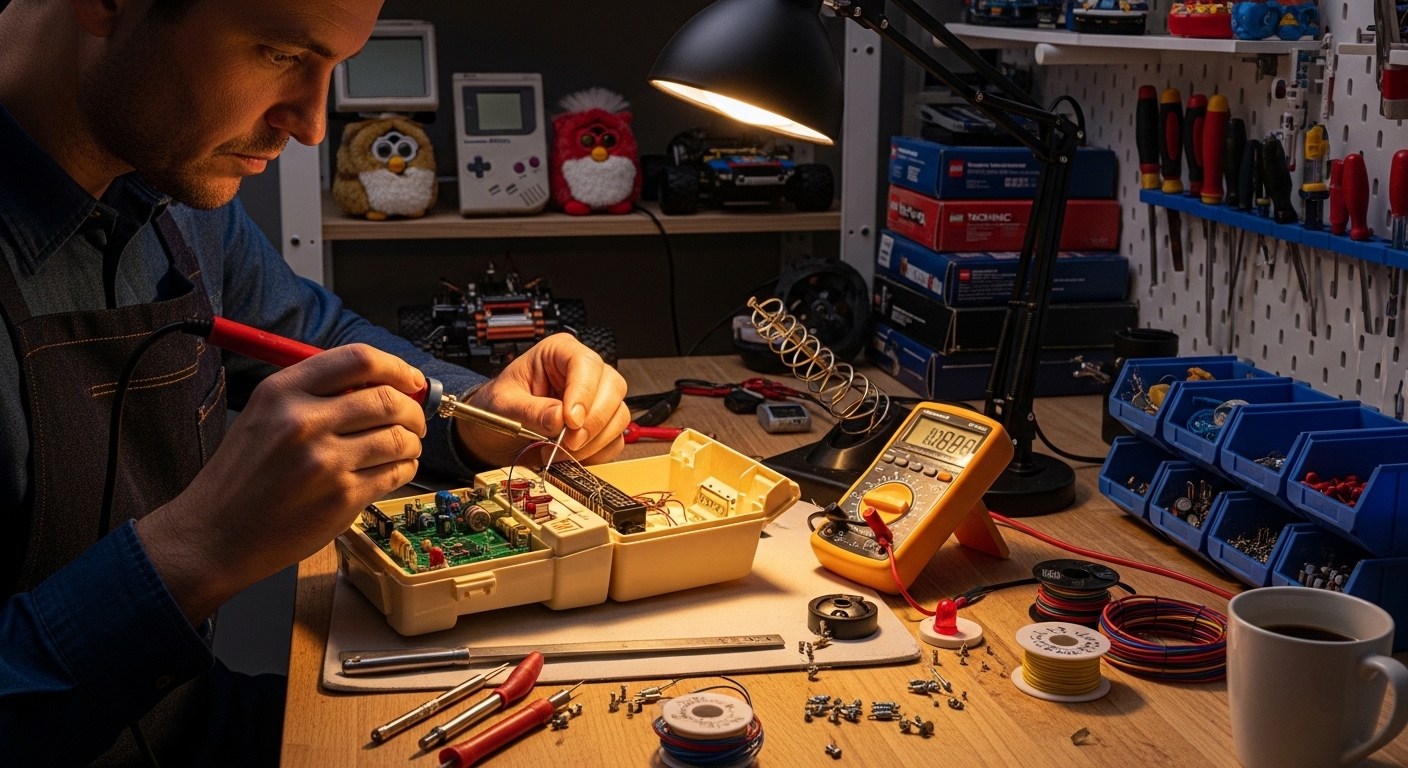
Every craft requires the right tools, and reviving electronic toys is no exception. Building a capable yet affordable toolkit is the first step on your journey. You don’t need a professional electronics lab; a few key items will handle the vast majority of toy repairs. The heart of your kit will be a soldering iron. For delicate toy circuits, a low-wattage, pencil-style iron, perhaps 15 to 30 watts, is ideal. Paired with this, you’ll need some thin, rosin-core solder. A digital multimeter is your best friend for diagnostics. This indispensable device allows you to check for battery voltage, test for continuity in wires and switches, and understand where electricity is failing to flow. You don’t need an expensive model; a basic one will do wonders. Next, a set of precision screwdrivers is a must, as toys are often held together with tiny Phillips or flathead screws. To safely open plastic casings without causing damage, a set of plastic prying tools or ‘spudgers’ is invaluable. A simple wire stripper and cutter will make handling broken wires a clean and easy process. Finally, a ‘helping hands’ tool, which is a small stand with alligator clips, can hold wires and components steady while you solder, freeing up your own hands. For organization, a simple tackle box or compartmentalized case can keep all your small parts and tools in order. While items like a hot glue gun for reinforcing parts or even a 3D printer for creating custom replacements are fantastic additions for later, this core set of tools will empower you to tackle almost any broken toy that comes your way.
Safety first mastering the basics of electronic repair
Diving into the world of electronics can seem intimidating, but the good news is that most battery-powered toys operate on very low, safe voltages. They are the perfect training ground for learning fundamental electronic principles without the risks associated with household AC power. However, safety should always be your top priority. The first and most important rule is to always remove the batteries before you begin any disassembly or repair. This prevents any accidental short circuits that could damage the toy’s components or, in rare cases, cause a battery to overheat. When you are working, pay close attention to battery terminals. If you see any crusty, whitish, or greenish buildup, that’s corrosion from a leaking battery. This can be carefully cleaned using a cotton swab dipped in a mild acid like white vinegar or lemon juice, followed by a clean swab to dry the area. When you start soldering, proper ventilation is key. Solder fumes can be irritating, so work in a well-ventilated room or use a small fan to blow the fumes away from your face. Safety glasses are also highly recommended to protect your eyes from stray solder splashes or flying bits of plastic. Remember that the tip of a soldering iron gets extremely hot, so always return it to its stand when not in use and keep it far from flammable materials. By respecting these basic safety protocols, you create a secure environment where you can focus on the fun and challenge of the repair itself, making the experience enjoyable and educational for everyone involved.
Diagnosing the silence common electronic toy ailments
When a toy stops working, the problem is often simpler than you might think. A systematic approach to diagnosis can save you a lot of time and frustration. Begin with the most obvious culprit the power source. Use your multimeter to check the batteries. Are they fresh? Even new-looking batteries can be duds. Next, inspect the battery compartment itself. Look for the corrosion we mentioned earlier on the metal contacts. Dirty or corroded contacts can prevent power from ever reaching the circuit. If the contacts are clean and the batteries are good, the next logical place to look is the on/off switch. Switches are mechanical parts that experience wear and tear and are a very common point of failure. With the batteries removed, you can use your multimeter’s continuity setting to test the switch. Place one probe on the contact leading into the switch and the other on the contact leading out. When you flip the switch to ‘on’, the multimeter should beep, indicating a complete circuit. If it remains silent, you’ve found your broken part. If the power source and switch are fine, it’s time for a visual inspection. Carefully open the toy’s casing and look for any wires that have come loose or been completely disconnected. A single broken wire is one of the most frequent issues, especially on toys that have been dropped. Pay close attention to the points where wires are soldered to the circuit board, battery terminals, or motors, as these joints can break under stress. This methodical process, moving from the simplest to the more complex possibilities, will help you pinpoint the exact cause of the failure efficiently.
Product Recommendation:
- DINOBROS Dinosaur Scooter Toys Pull Back Cars Mini Finger Kick Scooters Boy Toy Age 3 4 5 6, Dino Gift Sets for Kids 4-Pack
- 1000Pcs Fidget Toys Pack, Bulk Party Favors for Kids, Stocking Stuffers, Treasure Box Chest, Birthday Party, Classroom Carnival Prizes, Pinata Stuffers, Goodie Bag Stuffers, Stress Relief, Sensory Toy
- 6Pack Flying Toys – Small Kites & Airplane Launcher for Kids (Boys & Girls, 3-8) – Outdoor Flying Kites & Glider Planes – Bulk Toys for Kids & Adults – Beach Trip
- LEGO Classic Medium Creative Brick Box 10696 Building Toy Set – Featuring Storage, Includes Train, Car, and a Tiger Figure, and Playset for Kids, Boys, and Girls Ages 4-99
- Minecraft Kids Smart Watch – Touchscreen Interactive Watch with 10 Customizable Clock Faces, Built-in Camera, Video Recorder, Alarm, Calculator, Games & Pedometer – Fits Wrists 5.5 to 8
The art of the fix from simple solders to motor swaps
Once you’ve diagnosed the problem, it’s time for the most satisfying part of the process the repair itself. Let’s start with the most common fix a broken wire. First, use your wire strippers to remove a small amount of the plastic insulation, about a quarter of an inch, from the end of the wire. If you are reattaching it to a circuit board, you may need to use a desoldering braid or pump to remove the old, broken solder from the connection point. Next, you’ll ‘tin’ the wire by applying a small amount of fresh solder to the exposed strands. This helps the wire bond cleanly to the connection point. Now, hold the tinned wire against the contact point and briefly touch both with the tip of your hot soldering iron. The solder will melt and flow, creating a strong, shiny new connection. The key is to be quick; holding the iron on the board for too long can damage sensitive components. Replacing a faulty switch or button follows a similar process of desoldering the old part and soldering the new one in its place. For a non-working motor, which is common in cars and other moving toys, the process is also straightforward. Motors are usually connected by two wires. You can test a motor by briefly touching its contacts with the leads from two AA batteries. If it doesn’t spin, it likely needs replacing. Note the motor’s size and any voltage markings on it, then search online for a matching replacement. Desolder the two wires, remove the old motor, and solder the wires to the new one. A dab of hot glue can help secure the new motor in place if the original mounting is broken. These fundamental repair techniques will form the backbone of your toy revivalist skills.
Breathing new life upgrading with lights and sounds
Repairing a toy is rewarding, but upgrading it is where your creativity can truly shine. This is your chance to add a personal touch and make a toy even better than it was new. One of the simplest and most visually impressive upgrades is adding LEDs or Light Emitting Diodes. Imagine giving a toy robot glowing eyes or adding underglow to a toy car. LEDs are cheap, come in many colors, and use very little power. The key to using an LED is to pair it with a current-limiting resistor to prevent it from burning out. You can find simple online calculators to help you determine the correct resistor value based on your toy’s battery voltage. You can wire the LED and resistor to the toy’s main power switch, so they turn on with the rest of the toy, or add a separate, tiny switch for custom control. Another fantastic upgrade involves sound. Many older toys have very simple, often annoying, sound effects. You can replace or supplement these with inexpensive sound modules. Some modules allow you to record your own sounds or voice messages, which can be triggered by a button press. Imagine a teddy bear that plays a recorded message from a grandparent or a toy car that makes a custom engine sound you recorded yourself. These modules are often self-contained units with a speaker and battery holder, making them incredibly easy to integrate into a toy’s existing shell. By learning to add these simple light and sound enhancements, you elevate your skills from mere repair to custom modification, opening up a whole new world of possibilities for your projects.
The next frontier 3D printing and smart toy conversions
As you become more confident, you can explore advanced techniques that are revolutionizing the world of DIY repair and customization. The rise of affordable 3D printing has been a complete game-changer for toy revivalists. That broken battery cover, a snapped gear, or a unique plastic bracket that is impossible to find is no longer a death sentence for a toy. With basic 3D modeling skills or by finding a pre-made design on a community site like Thingiverse, you can print a perfect replacement part from your own home. This technology allows you to replicate parts that have been out of production for decades, preserving vintage electronic toys for a new generation. Beyond just replication, you can design and print custom mounts for new components, like a holder for a sound module or a new housing for added LEDs. For the truly adventurous, the world of microcontrollers offers the ultimate upgrade path. Tiny, inexpensive computers like an Arduino or a Raspberry Pi Pico can be integrated into a toy to give it a completely new ‘brain’. This allows you to move beyond simple on/off circuits into the realm of programming. You could program a toy robot to follow a light source, convert a simple push car into a Bluetooth-controlled vehicle, or create complex, interactive light and sound sequences. While this requires a willingness to learn some basic coding, the payoff is immense. It transforms the hobby of toy repair into a deeply engaging STEM education experience, teaching the fundamentals of programming and robotics in a fun, hands-on way. This is the pinnacle of toy revivalism, where you are not just fixing a toy but completely reimagining it.
In conclusion, the journey of a toy revivalist is a deeply rewarding one that extends far beyond the workbench. By choosing to repair and upgrade rather than discard, you are making a conscious choice for sustainability, actively reducing the tide of electronic waste. Every successful fix is a small victory, saving a cherished item from the landfill and saving you money in the process. More importantly, this practice is a gateway to acquiring invaluable new skills. You’ll learn the practical magic of electronics, the patience of diagnostics, and the precision of soldering. These are more than just hobbyist skills; they are foundational concepts in science, technology, engineering, and math that are increasingly vital in our modern world. Sharing this process with a child can be a powerful bonding and educational experience, demystifying the technology that surrounds them and fostering a sense of curiosity and empowerment. Look at that box of broken toys not as a graveyard of past fun, but as a treasure chest of future projects. Each silent robot and motionless car is an invitation to learn, to create, and to innovate. Pick one, open it up, and begin your adventure as a toy revivalist today. The satisfaction you’ll feel is something no new purchase can ever replicate.