
Have you ever wondered how celebrities achieve that flawlessly sculpted yet incredibly natural makeup look? The kind where their features are defined and radiant, but you can’t quite pinpoint where the makeup begins or ends. The secret is often a technique that has taken the beauty world by storm, known as underpainting. Popularized by celebrity makeup artist Mary Phillips, this method flips the traditional makeup application on its head. Instead of layering contour and concealer over foundation, you apply them underneath. This approach creates a ‘lit-from-within’ glow and a subtle, ‘second-skin’ definition that looks less like makeup and more like your natural bone structure. It’s a game-changer for anyone seeking a sophisticated and seamless finish. In this guide, we will walk you through the entire underpainting blueprint. We will cover everything from prepping your skin and choosing the right products to the specific application and blending techniques that guarantee a sculpted, long-lasting look.
What is underpainting and why is it so popular
Underpainting is a professional makeup artist technique that involves applying contour, bronzer, and concealer to the face before the foundation. Think of it as creating the architectural framework of your face first and then draping a sheer veil of color over it. This method isn’t entirely new; artists have used similar principles for decades to create dimension. However, its recent surge in popularity is a direct result of social media and artists like Mary Phillips sharing their secrets. The appeal lies in the final result. Traditional contouring can sometimes look harsh or obvious, with clear stripes of product sitting on top of the base. Underpainting, on the other hand, diffuses these products under a thin layer of foundation, making the shadows and highlights appear to emerge naturally from your skin. This creates a soft-focus, sculpted effect that is both beautiful in photos and undetectable in person. It’s the ultimate ‘your skin but better’ technique. The trend also aligns perfectly with the current movement towards more minimalist and skin-focused beauty routines. It allows you to use less foundation, letting your real skin texture show through while still providing a polished and put-together appearance. It’s a versatile method that works for everyday wear and special occasions alike.
Preparing your canvas for a flawless base
The success of any makeup look, especially one as detailed as underpainting, begins with exceptional skin preparation. A smooth, hydrated canvas is non-negotiable for achieving a seamless blend. Start with your usual skincare routine, ensuring your face is clean and well-moisturized. A hydrated base prevents products from clinging to dry patches and helps them melt into the skin. After your moisturizer has fully absorbed, the next step is a primer. Choosing the right primer is crucial and depends entirely on your skin type and desired finish. If you have oily skin, a mattifying or pore-filling primer applied to the T-zone can control shine and create a smoother surface. For those with dry skin, a hydrating or illuminating primer will provide a dewy base and prevent the makeup from looking flat. A good primer not only extends the wear of your makeup but also acts as a barrier between your skin and the products, ensuring a more even application. Allow your primer a minute or two to set before moving on. This small waiting period can make a significant difference in how your makeup performs throughout the day. Remember, the goal of this prep stage is to create the best possible version of your skin, so that the subsequent layers of makeup have a perfect foundation to adhere to.
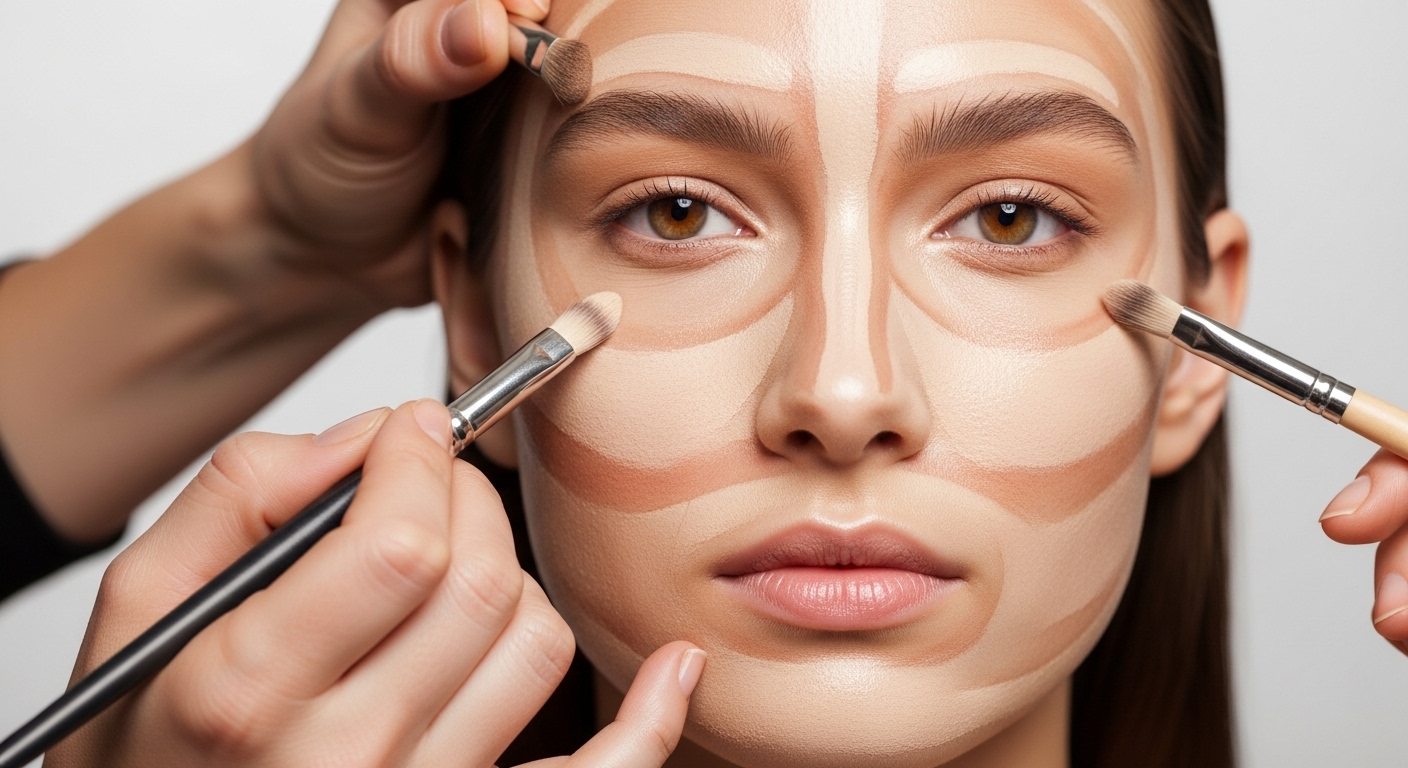
The art of sculpting with contour and concealer
This is where the magic of underpainting truly begins. For this technique, cream or liquid products are generally preferred over powders because they blend more easily and create a more skin-like finish. Start with your cream contour or a cool-toned cream bronzer. Using a small brush or your fingers, apply the product to the areas you want to create shadows and definition. Common placements include the hollows of your cheeks, along your jawline, on the sides of your nose, and around the perimeter of your forehead. Don’t be afraid to be a little generous with the product, but focus on placing it precisely where the shadows would naturally fall. Next, take your concealer. You’ll want a shade that is one or two tones lighter than your skin. Apply this to the high points of your face where you want to bring light and attention. This includes under your eyes, down the center of your nose, in the middle of your forehead, and on your chin. This step is about brightening and lifting the face. Once your contour and concealer are placed, it’s time to blend. Using a damp makeup sponge or a dense brush, gently press and stipple the products into your skin. Blend the edges of the contour and concealer, but try to keep them in their designated areas. The goal is to soften the lines, not to mix the light and dark shades together. Your face should now have a map of highlights and shadows.
Product Recommendation:
- VERONNI Face Paint Kit, 20 Colors Oil Based Face Painting Kit for Clown Cosplay Christmas Party Black White Red Body Paints for Adults With Blue Brushes
- SHANY Cosmetics SHANY Gift Surprise- AMAZON EXCLUSIVE – All in One Makeup Bundle – COLORS & SELECTION VARY MULTI-COLORED, Unscented
- All in One Makeup Kit for Makeup storage bag 2X14 Colors Eyeshadow Palette Liquid Foundation Eyeliner Pencils Contouring Stick Lip Gloss 20Pcs Makeup Brushes For Women Girls Teens (Black)
- TUMOVO Paint by Numbers Kit for Adults, Bright Eye Paint by Numbers, Flower Makeup Adults’ Paint-by-Number Kits, Blossom Flowers Adult Paint by Number Kits, 16X20 Inch Flameless Paint by Numbers
- BOBISUKA Blank in the Dark Black + White Oil Face Body Paint Set, Large Capacity Professional Paint Palette Kit with Brushes for Art Theater Halloween Party Cosplay Clown Sfx Makeup for Adults
Choosing the right foundation for the underpainting technique
The foundation you choose is a critical component of a successful underpainting look. This is not the time for a full-coverage, matte formula. Using a heavy foundation would completely cover all the beautiful sculpting work you just did, defeating the entire purpose of the technique. Instead, you need to opt for a sheer to medium coverage foundation. Look for formulas described as ‘luminous’, ‘serum’, ‘radiant’, or ‘buildable’. These types of foundations will even out your skin tone and perfect your complexion without masking the dimension you’ve created underneath. Tinted moisturizers and skin tints are also excellent choices for this method. The key is to let the underpainted contour and concealer show through in a subtle, diffused way. When it comes to application, the tool and technique are just as important as the product. A damp beauty sponge is often the best tool for this job. Dispense your foundation onto the back of your hand, pick up a small amount with a damp sponge, and gently stipple or press it onto your skin. Start in the center of your face and work your way outwards. Avoid any wiping or dragging motions, as this will smudge and move the products you’ve already blended. The stippling motion gently deposits a thin layer of foundation, melding it with the layers below for a truly seamless, second-skin effect. You’ll use significantly less foundation than you might be used to.
The blending process for a seamless second-skin finish
Perfecting the final blend is arguably the most important stage of the underpainting process. This is the step that transforms a map of products into a cohesive, believable look. After applying the sheer layer of foundation with a stippling motion, take a moment to assess your work. You should see a soft, dimensional effect where the contour and concealer are subtly visible through the foundation. Now, take your clean, damp makeup sponge or the brush you used for foundation and go over your entire face one more time. Use the same gentle pressing and bouncing motion. This final pass helps to marry all the layers together, ensuring there are no harsh lines or unblended edges. Pay special attention to the areas where the contour, highlight, and foundation meet. The transitions should be completely seamless. If you feel you’ve applied a little too much foundation and have lost some of the definition, don’t panic. You can easily reintroduce it. Simply take a tiny amount of your cream contour or concealer on a small brush and lightly tap it over the foundation in the desired area, then blend the edges softly with your sponge. The beauty of working with cream and liquid products is their forgiving and buildable nature. The ultimate goal is to create a finish that looks like real skin, complete with natural-looking shadows and highlights. It should not look like you are wearing layers of makeup, but rather that you are naturally blessed with amazing bone structure.
Setting and finishing your sculpted masterpiece
Once you are happy with your base, the final steps are to set the makeup and add back a touch of color and glow. Setting your makeup is essential for longevity, especially since you’ve used primarily cream and liquid products. The key is to be strategic. Instead of applying a heavy layer of powder all over, use a light hand. Take a fluffy brush and a finely milled translucent setting powder. Gently press the powder into the areas where you tend to get oily or crease, such as your T-zone and under your eyes. This targeted approach will lock your makeup in place without dulling the radiant finish you’ve worked so hard to achieve. Next, you can enhance the look with powder blush and highlighter. Apply a powder blush to the apples of your cheeks, sweeping it slightly upwards to lift the face. This adds a healthy flush of color. Then, apply a powder highlighter to the very highest points of your face where the light would naturally hit, like the tops of your cheekbones, the tip of your nose, and your brow bone. This will amplify the dimension created by your underpainted concealer. These final powder layers should be applied lightly to complement, not overpower, the soft sculpt of your base. Finish with a setting spray to melt all the powder and cream products together for a final, flawless finish. Your underpainted look is now complete and ready to last all day.
In conclusion, the underpainting technique is more than just a fleeting trend; it’s a fundamental shift in how we can approach base makeup. By prioritizing dimension and definition first, it allows for a more natural and sophisticated result. This method empowers you to use less product, specifically less foundation, letting your skin’s true texture shine through while still achieving a sculpted, polished effect. We’ve walked through the essential chapters of this process, from the critical importance of skin prep to the artful placement of contour and concealer. We’ve highlighted the need for a sheer foundation and the gentle stippling motion required to blend everything into a seamless, second-skin finish. The final touches of strategic powdering and a pop of blush and highlight complete the look, locking in your work for all-day wear. Embracing underpainting may require a slight adjustment to your routine, but the payoff is a radiant, naturally defined look that appears to come from within. It’s a testament to the idea that sometimes, the most impactful makeup is the makeup you can’t see. So give this blueprint a try and unlock the secret to a flawlessly sculpted look.