
Have you ever wondered how celebrities achieve that effortlessly sculpted, lit-from-within glow that looks like real skin, only better? The secret is often not what they put on last, but what they put on first. Enter underpainting, a revolutionary makeup technique brought into the mainstream spotlight by celebrity makeup artists like Mary Phillips. This method, also known as the reverse contour, flips the traditional makeup application on its head. Instead of layering contour and concealer over foundation, you apply them underneath. The result is a soft, diffused, and incredibly natural-looking dimension that appears to emanate from your skin itself. This approach has become a cornerstone of modern beauty, moving away from the heavy, painted-on looks of the past towards a more refined and realistic finish. This guide will provide a complete blueprint for mastering this game-changing technique. We will explore what underpainting truly is, the essential tools you will need, a step-by-step tutorial, how to avoid common pitfalls, and ways to customize the method for your unique skin type.
Understanding the magic of underpainting
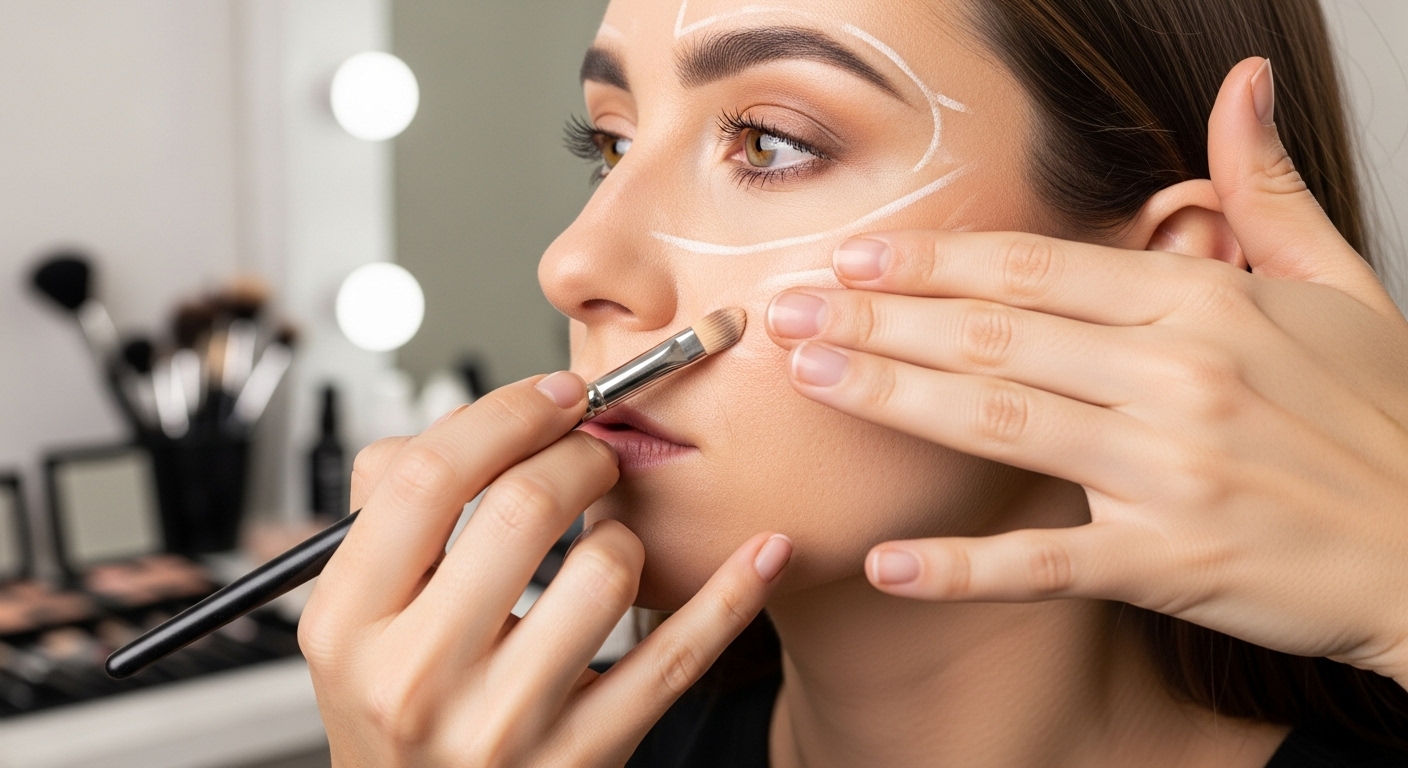
So what exactly is underpainting? At its core, it is a layering technique that prioritizes structure and dimension from the very beginning of your makeup routine. The process involves applying your cream or liquid contour, bronzer, and highlight directly onto your prepped skin, before any foundation is introduced. You strategically place these products to sculpt, lift, and brighten your facial features. After blending these initial layers, you then apply a very sheer layer of foundation over the top. This final step is crucial; it does not cover up your work but instead unifies all the elements, melting them together for a seamless, undetectable finish. The foundation acts like a veil, allowing the underlying contour and highlight to peek through in a subtle, natural way. This contrasts sharply with traditional methods where foundation creates a blank canvas, which you then have to work to add dimension back into. By building the shape first, underpainting creates a look that is far less likely to appear heavy, cakey, or obvious. It is the key to achieving a professional-looking application that enhances your natural bone structure rather than masking it. The growing popularity of this technique is a direct response to the demand for ‘your skin but better’ makeup looks that dominate social media feeds and red carpets today.
Assembling your essential underpainting toolkit
The success of the underpainting technique heavily relies on using the right products. The golden rule is to stick with cream or liquid formulas for your contour, highlight, and even blush. These textures are designed to melt into the skin and blend seamlessly with one another, which is essential for creating a smooth base before foundation. Powder products applied too early can create a patchy, difficult-to-blend mess. When selecting a contour product, look for a cool-toned shade that is one or two shades deeper than your natural skin tone; this will mimic the appearance of natural shadows. For concealer or highlight, choose a shade one or two levels lighter than your skin to create brightness. A liquid or cream highlighter without chunky glitter will give you that coveted ‘lit-from-within’ effect. The tools you use are just as important. A dense but flexible brush is perfect for stippling and blending cream contour without it becoming muddy. For concealer, you can use a smaller brush for precision or simply your fingertips, as the warmth from your skin helps the product melt in beautifully. A damp beauty sponge is another non-negotiable tool in this process. It is perfect for the final blending steps and for applying the sheer layer of foundation, ensuring you press the product into the skin rather than swiping away the careful work you did underneath. Investing in the right blend of products and tools will make all the difference in achieving a flawless result.
The step-by-step reverse contour blueprint
Ready to master the technique? Follow this detailed blueprint for a flawless finish. The first and most critical step is skin preparation. Underpainting works best on a smooth, hydrated canvas. Start with your usual skincare routine, ensuring you finish with a good moisturizer and a primer that suits your skin type. Once your skin is prepped, it is time to sculpt. Take your cream contour product and apply it to the areas you want to define. This typically includes the hollows of your cheeks, along your jawline, on the sides of your nose, and around your hairline. Do not be afraid to be a little generous, but keep the placement precise. Next, apply your brightening concealer. Place it under your eyes, in the center of your forehead, down the bridge of your nose, and on your chin. These are the high points of your face where light would naturally hit. Now comes the most important part of the pre-foundation process, blending. Using a damp sponge or a dense brush, gently blend the edges of the contour and concealer. You want to diffuse the lines so there are no harsh transitions, but do not over-blend to the point that the colors become muddy. The goal is to create a soft, gradient map of shadows and light on your face. You should still be able to clearly see the defined areas before moving on to the final step.
Product Recommendation:
- 3D Tiger Temporary Tattoo For Men Women,Large Black Half Sleeve Realistic Animal Tiger Fake Tattoo Adult Teen, Long Lasting Lion Leopard Wolf Temp Tatoo Sticker Arm Chest Body Art Makeup, 8-Sheet
- 8 Sheets Turtle Temporary Tattoos Black Tribal Maori Sea Animal Birthday Party Supplies Favors Decorations Body Fake Tattoo Stickers For adult Men Women Make up
- 100 Pcs 2.76 Inch Inspirational Compact Mirror Bulk Party Favors Purse Small Mirror Pocket Mini Gifts for Women Adult Coworker Mother’s Day Teacher Graduation Friends (White)
- Face Painting Kit for Kids Adults, Water Activated Body Face Paint, 15 Colors Water Based Facepaints Fx Makeup Palette ,Non Toxic Hypoallergenic Safe Facepaint for Halloween Party Birthday Cosplay
- Makeup Set for Women, Makeup Kit for Beginners & Professionals, Makeup Set for Teens & Adults, Make up Gift, Eyeshadow Palette, Face & Eye Make up
Choosing and applying your foundation veil
The final step in the underpainting process is the application of foundation, which acts as a unifying veil. This is where many people can go wrong, so paying close attention to the formula and application method is key. The ideal foundation for underpainting is one with sheer to medium, buildable coverage. A heavy, full-coverage foundation will completely erase all the beautiful dimension you just created, defeating the entire purpose of the technique. Look for formulas described as ‘skin tints’, ‘serum foundations’, or ‘light coverage’. The finish can be dewy or natural, depending on your preference and skin type. When it comes to application, put away your dense foundation brushes. The best tool for this job is a damp beauty sponge. Dispense a small amount of foundation onto the back of your hand, pick it up with your sponge, and begin gently stippling or pressing it onto your skin. Use a light bouncing motion. Do not swipe or drag the sponge across your face, as this will disrupt and move the cream products underneath. Start in the center of your face and work your way outwards, applying the thinnest layer possible. You will notice how the foundation evens out your skin tone while allowing the subtle sculpture of the contour and the brightness of the highlight to shine through. The result is a truly integrated, dimensional look that appears incredibly natural.
Common underpainting mistakes to avoid
While underpainting can deliver stunning results, a few common mistakes can derail your efforts. One of the biggest errors is using too much product. It is easy to get carried away with contour and concealer, but this can lead to a heavy, cakey base that is difficult to blend. Always start with a small amount and build up if necessary. Another frequent issue is improper blending. Rushing the blending stage or using the wrong tools can result in harsh lines or a muddy appearance where the contour and highlight mix improperly. Take your time to gently diffuse the edges of each product before applying foundation. The choice of product formula is also critical. As mentioned, using powders for your initial sculpting will not work. They do not blend well with the subsequent liquid foundation layer and will create a patchy, uneven texture. Stick exclusively to cream and liquid formulas for the ‘under’ part of your painting. Furthermore, choosing the wrong shades can be a disaster. A contour that is too warm or orange can look unnatural, while a concealer that is excessively light can create a stark, unflattering contrast. Always select shades that complement your natural skin tone to mimic real shadows and highlights. Finally, avoid applying a thick layer of foundation on top. The goal is a sheer veil, so opt for light coverage and apply it sparingly with a gentle pressing motion.
Adapting underpainting for your skin type
The beauty of the underpainting technique is its versatility. It can be adapted to suit virtually any skin type with a few minor adjustments. If you have oily skin, the thought of layering cream products might seem daunting, but it is entirely manageable. The key is in the preparation and setting. Start with an oil-controlling or mattifying primer. Opt for long-wear cream formulas that are less likely to break down throughout the day. After you have applied your sheer foundation layer, it is crucial to set your makeup. Use a translucent setting powder and a powder puff to press the powder into the T-zone and any other areas where you tend to get shiny. This will lock everything in place and ensure your sculpted look lasts. For those with dry skin, hydration is paramount. Begin with a rich moisturizer and a hydrating primer to create a plump, smooth canvas. Choose dewy, luminous cream products that contain hydrating ingredients like hyaluronic acid. These will give your skin a healthy, radiant finish rather than settling into dry patches. You might even want to mix a drop of liquid illuminator into your foundation for an extra boost of glow. You can be more selective with your powder, perhaps only applying a tiny amount under the eyes. This customization ensures that no matter your skin’s needs, you can make the underpainting technique work for you and achieve that flawless, skin-like finish.
In conclusion, the reverse contour or underpainting technique is more than just a fleeting trend; it represents a fundamental shift in how we approach makeup application. By prioritizing structure and dimension from the start, it allows for a finished look that is seamlessly integrated into the skin. This method moves away from the idea of creating a blank canvas and instead focuses on enhancing the natural architecture of the face. The result is a sophisticated, soft-focus effect that looks both polished and incredibly real. Mastering this blueprint requires a little practice, the right products, and a light hand, but the payoff is immense. It empowers you to create a sculpted, radiant complexion that does not feel heavy or look like a mask. Remember to focus on cream formulas, blend diligently, and choose a sheer foundation to act as a unifying veil. Whether you are preparing for a special event or simply want to elevate your daily routine, embracing underpainting is your ticket to achieving that enviable, lit-from-within celebrity glow. So go ahead, experiment with the steps, and unlock a new level of flawless for your makeup artistry.