
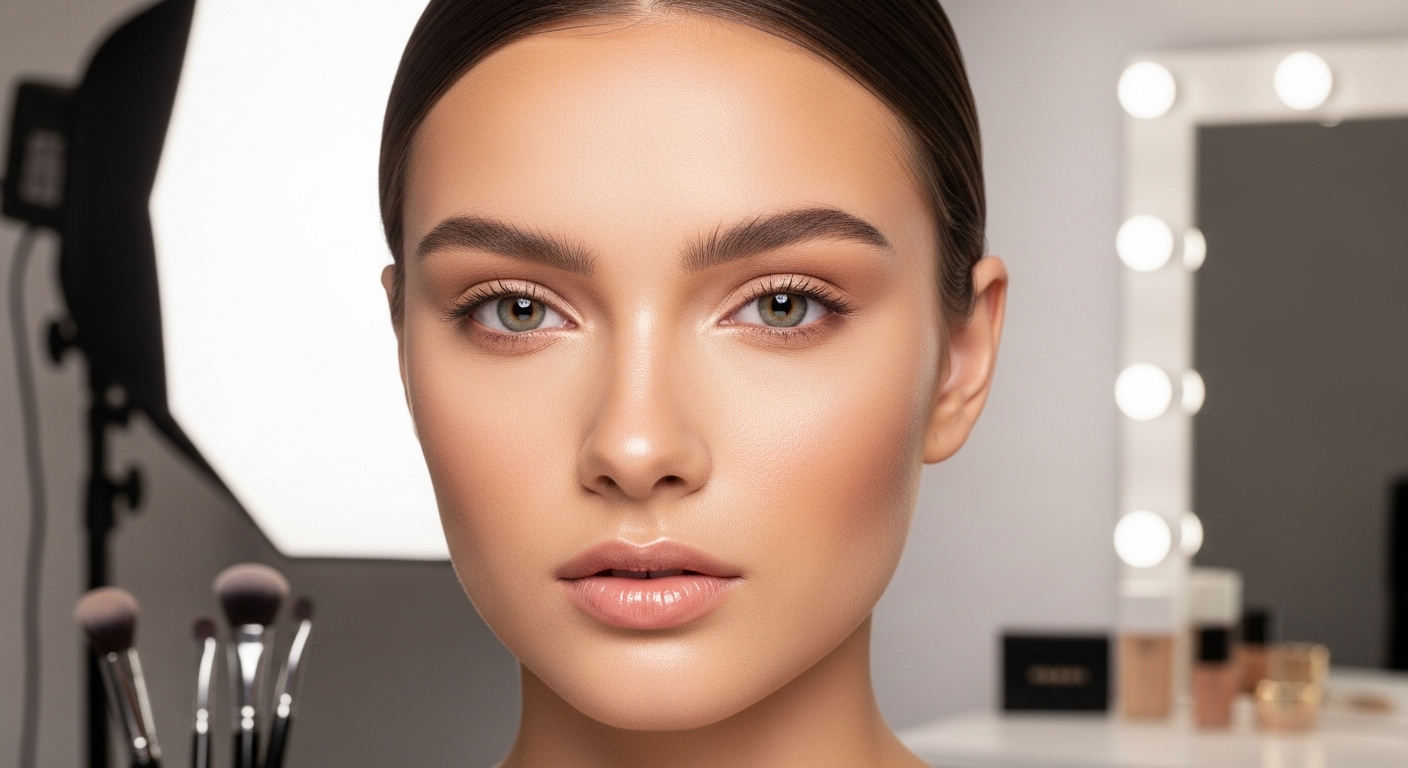
Have you ever wondered how celebrities achieve that impossibly perfect, ‘lit-from-within’ complexion that looks more like great skin than great makeup? The answer might be simpler and more accessible than you think. It lies in a technique that has taken social media by storm, yet has been a professional secret for years; underpainting. This method, popularized by celebrity makeup artists like Mary Phillips for clients such as Hailey Bieber and Kendall Jenner, flips the conventional makeup routine on its head. Instead of layering contour, blush, and concealer on top of foundation, underpainting involves applying these products first, creating a seamless, blended base that looks incredibly natural. This guide will walk you through everything you need to know to master this transformative trend. We will explore what underpainting is, the numerous benefits of this approach, a detailed step-by-step tutorial, and how to select the perfect products. We will also cover common mistakes to avoid and advanced tips to customize the look for your unique features and skin type. Get ready to unlock the secret to your most radiant complexion yet.
What is the underpainting makeup technique
At its core, the underpainting makeup technique is the art of sculpting and adding color to the face before applying foundation. It is a strategic reversal of the standard application order. Traditionally, one would apply a layer of foundation to create a blank canvas and then add dimension back with contour, bronzer, blush, and highlighter on top. Underpainting challenges this by building that dimension directly onto the prepped skin. The foundation is then applied as the final veil, a sheer layer that unifies the tones and textures without masking the careful work underneath. The result is a finish where shadows and highlights appear to emanate from the skin itself, rather than sitting on the surface. This creates a soft-focus effect that is both subtle and powerful, defining your features in the most natural way possible. While it feels like a modern TikTok trend, this method has long been a staple in the kits of professional makeup artists for film and photoshoots, where a flawless, non-cakey finish is paramount. Its recent surge in mainstream popularity is a testament to the collective desire for a more authentic and skin-focused approach to beauty. It’s less about transformation and more about enhancement, allowing your own skin to be the star of the show.
The benefits of a blended base
The widespread appeal of underpainting stems from its remarkable benefits, which address many common makeup frustrations. The most significant advantage is the creation of a truly seamless and natural finish. By placing sculpting products underneath foundation, you eliminate any harsh lines or visible edges. The foundation acts as a diffuser, melting everything together for a soft, airbrushed effect that mimics real skin. This process also drastically reduces the risk of a heavy or ‘cakey’ appearance. Because you are building dimension first, you often need significantly less foundation. You are no longer trying to cover imperfections and then re-add shape; instead, you are simply evening out the skin tone with a light layer, which allows the skin to breathe and look fresher. Another key benefit is longevity. Cream and liquid products used for underpainting tend to adhere better to the skin than powders. When topped with a thin layer of foundation and set properly, this layered structure creates a durable base that wears more evenly and lasts longer throughout the day without separating or becoming patchy. This is why it’s a favored technique for long events and red carpets. The sought-after ‘lit-from-within’ glow is perhaps the most celebrated outcome. By applying highlighter and radiant blush under your base, the glow seems to peek through the foundation, creating a luminous quality that looks entirely natural and healthy.
Your step by step guide to underpainting
Mastering underpainting is all about an intentional process and a light hand. Following these steps will help you achieve a flawless, blended base every time. First and foremost, begin with a clean, well-prepped canvas. This means cleansing, moisturizing, and applying a primer suited to your skin type. Hydrated skin is crucial for helping cream products blend smoothly. Next, apply your cream or liquid contour. Focus on the areas you want to create shadows and dimension, such as the hollows of your cheeks, along your jawline, the sides of your nose, and around your hairline. Use a small brush or your fingers to place the product and then gently blend the edges. After contouring, apply a brightening concealer. Place it under the eyes, in the center of your forehead, down the bridge of your nose, and on your chin. These are the high points of your face where light would naturally hit. Then, add your cream blush to the apples of your cheeks, blending it upwards towards your temples. At this stage, your face will look quite sculpted and colorful. The key now is to gently blend everything with a damp makeup sponge or a dense brush. You want to soften the edges of each product without muddying them together. Finally, it is time for foundation. Choose a sheer to medium coverage formula. Using a stippling motion with a brush or a gentle pressing motion with a sponge, apply a very thin layer over your entire face. Do not swipe or drag the product, as this will disturb the layers underneath. The goal is to unify, not to cover.
Product Recommendation:
- Temporary Glitter Tattoos Kit for Kids, 32 Colors, 165 Stencils, 3 Glue, 5 Brushes, 1 Powder Puff, Adults & Kids Arts Make Up Kit, Holiday Gifts for Girls & Boys
- Temporary Tattoo Markers for Kids and Adults, 12 Metallic Markers and 155 Tattoo Stencil Designs, Cosmetic Tattoos Pens for Kids and Adults
- All in One Makeup Kit for Women Full Kit, Make Up Gift Set for Women, Makeup Essential Bundle Includes Foundation Face Primer Eyeshadow Contour Palette Lipstick Eyeliner Mascara Cosmetic Brush Set
- Dinosaur Gifts for Adults Makeup Bag, Decor Birthday Christmas Gifts for Women Her Friends Dinosaur Makeup Bag Lovers Animal Lover
- skeleton mouth tattoo,devil face tattoo,halloween spider web face stickers,halloween make up adults,face tattoos for men and women,horror make up,scary face tattoos (B)
Choosing the right products for underpainting
The success of the underpainting technique heavily relies on the formulation of the products you choose. The golden rule is to use cream or liquid products for your contour, blush, and highlight. These textures are designed to melt into the skin and blend seamlessly with one another, which is essential for creating a smooth canvas before the foundation goes on top. Powder products, when applied before a liquid foundation, can lead to pilling, patchiness, and a generally uneven texture. When selecting a contour product, look for a cream stick or a liquid wand with a cool-toned shade that mimics a natural shadow. For blush, a cream pot or liquid tint provides a dewy, translucent flush of color that looks incredibly skin-like. Similarly, a liquid or cream illuminator will give you that coveted ‘glow-from-within’ when applied to the high points of the face before your base. The foundation itself is just as important. Opt for a formula that offers sheer to medium coverage. A full-coverage, matte foundation would defeat the purpose of underpainting by completely obscuring the dimension you have worked to create. Look for foundations with descriptions like ‘radiant’, ‘skin tint’, ‘luminous’, or ‘serum foundation’. These formulas are designed to even out skin tone while still allowing the natural texture and underlying colors to peek through. The goal is to let the underpainting do the heavy lifting of sculpting and coloring, while the foundation acts as a unifying final touch.
Common mistakes to avoid
While underpainting can deliver stunning results, a few common missteps can derail the process. One of the most frequent errors is using too much product. Remember that you are layering, so start with a minimal amount of contour, concealer, and blush. It is much easier to add more product than it is to take it away. Over-application can lead to a heavy feeling and make blending difficult. Another major pitfall is improper blending. It is crucial to soften the edges of each cream product before you apply foundation. If you leave harsh lines, they will likely still be visible through your base layer. Use a damp sponge or a stippling brush to press and melt the products into the skin until there are no obvious start and stop points. The choice of application tool for your foundation is also critical. A common mistake is to swipe or rub the foundation on, which inevitably smears and displaces all the careful work underneath. Instead, you must use a stippling or pressing motion. This technique gently deposits the foundation on top of the underpainted layers without moving them. Also, be mindful of product compatibility. As mentioned, avoid using powder products under a liquid or cream foundation, as this is a recipe for a cakey, separated mess. Stick to a consistent cream-to-liquid workflow until the final setting powder stage. Finally, choosing a foundation with too much coverage can render your efforts useless. If you apply a thick, full-coverage foundation, you will simply cover up all the beautiful dimension you created.
Advanced techniques and variations
Once you are comfortable with the basic principles of underpainting, you can begin to customize and elevate the technique to suit your specific needs and desired looks. For those with oily skin, for example, you can incorporate an extra step. After blending your cream products, apply a very light, translucent setting powder just over the contoured and concealed areas before you go in with your liquid foundation. This is a technique known as ‘baking’ in a more targeted way, and it can help control oil and increase the longevity of your makeup without adding bulk. Conversely, if you have very dry skin, you can enhance the dewy effect by mixing a drop of liquid illuminator directly into your foundation. This will amplify the glow from your underpainted highlighter and give your entire complexion a more hydrated, luminous appearance. Color correcting is another advanced skill that pairs perfectly with underpainting. If you have specific concerns like redness or dark circles, you can apply a thin layer of a color-correcting cream, like green for redness or peach for under-eye darkness, as the very first step before your contour. The subsequent layers of concealer and foundation will neutralize the correcting color, leaving you with an impeccably even-toned base. You can also play with the intensity for different occasions. For a very natural, ‘no-makeup’ makeup day, you might only underpaint with a touch of blush and concealer, skipping contour entirely. For a glamorous evening look, you can build up the intensity of your contour and highlight for more dramatic, sculpted results.
In conclusion, the underpainting trend is far more than a fleeting social media fad; it is a fundamental shift in makeup application that prioritizes a natural, skin-first aesthetic. By reversing the traditional order and building dimension from underneath, this technique allows you to achieve a seamlessly blended, sculpted, and radiant complexion that looks both flawless and utterly believable. We have journeyed through the core definition of underpainting, its substantial benefits like a non-cakey finish and enhanced longevity, and a clear, step-by-step guide to executing it perfectly. Understanding which products to choose, primarily creams and liquids, and which common mistakes to avoid, such as over-application and improper blending, are crucial pillars for success. As you grow more confident, experimenting with advanced variations for different skin types and occasions will allow you to make the technique truly your own. Embracing the blended base secret is not about masking your skin but about celebrating it. It is an invitation to play with light and shadow in a new way, unlocking a fresh, modern approach to beauty that empowers you to feel confident in your own enhanced skin.