
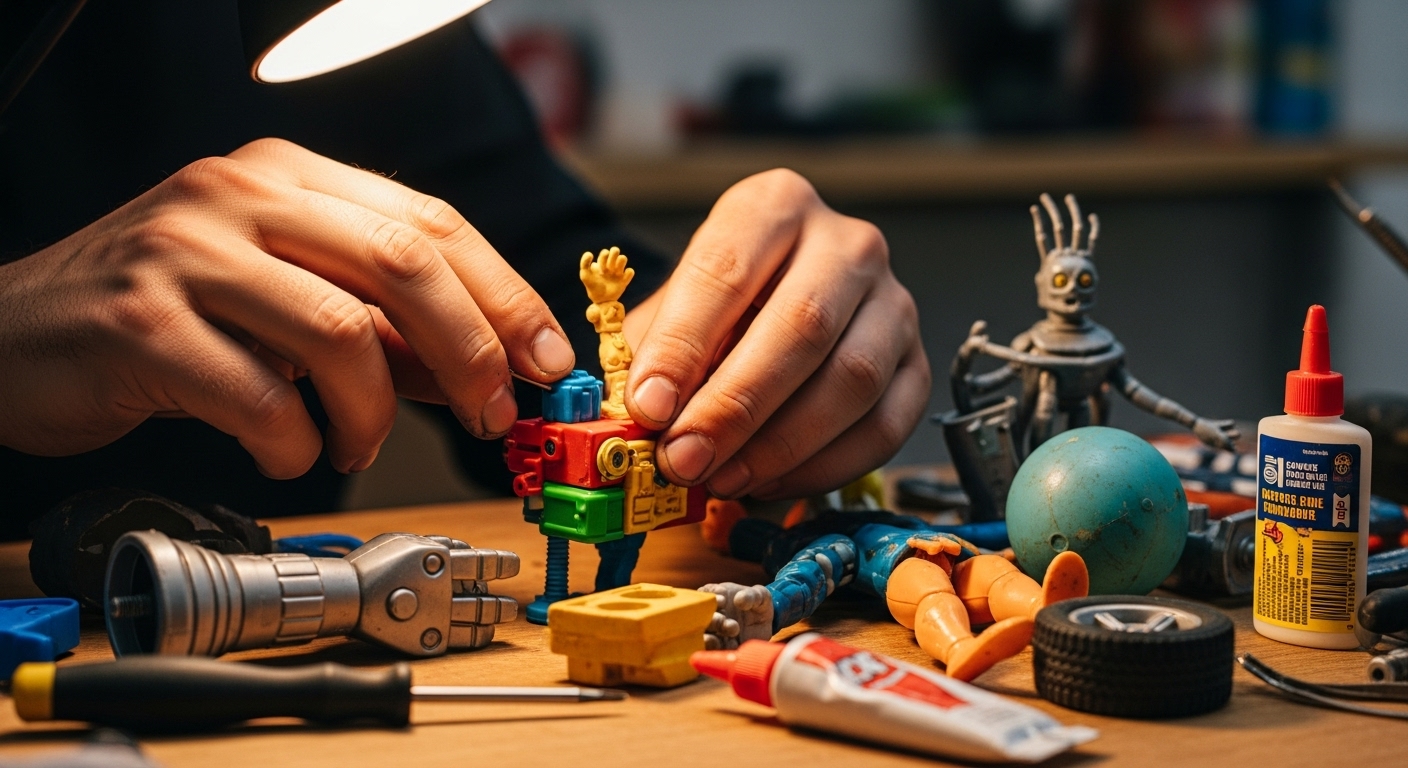
In every home with children, there exists a graveyard of cherished companions. It’s the box of broken toys, a sad collection of action figures with missing limbs, cars with snapped axles, and dolls with irreparable damage. For many, this is the end of the line. But what if it was just the beginning? Welcome to the world of toy mashing, a wildly creative and sustainable hobby that transforms broken plastic into breathtakingly unique works of art. This practice, also known in hobbyist circles as ‘kitbashing’, is about more than just repair; it’s about resurrection and reinvention. It’s a chance to breathe new life into forgotten fragments, creating one-of-a-kind characters that tell a new story. This guide will walk you through the entire process, from salvaging parts and gathering your tools to designing, assembling, and painting your very own custom creation. Prepare to unlock a new level of creativity and see that toy box in a whole new light.
The art of the toy salvage operation
Your journey into toy mashing begins with a treasure hunt. The first step is to build a ‘parts library’, an organized collection of components that will serve as your creative palette. Start with your own home’s collection of broken or unwanted toys. Don’t overlook anything; a cracked doll’s head could become a futuristic helmet, and a snapped robot arm could be a spaceship’s cannon. Expand your search to thrift stores, garage sales, and flea markets, which are goldmines for inexpensive materials. Look for toys with interesting textures, unique joint systems, or compelling shapes. Friends and family might also have a box of broken toys they’d be happy to donate to your cause. Once you have a good haul, the key is organization. Sort your parts not just by the toy they came from, but by category. Create bins for limbs, heads, torsos, wheels, wings, and mechanical greebles (a term for small, detailed bits that add visual interest). Further sorting by color, size, and plastic type can also be incredibly helpful. This organized library will streamline your creative process, allowing you to quickly find the perfect piece when inspiration strikes. Think of yourself as a sculptor, and these broken pieces are your clay.
Your essential kitbashing toolkit
While your imagination is your most important tool, a few physical items are essential for a successful toy mashup project. You don’t need a professional workshop to start; a basic, well-chosen toolkit will take you far. First and foremost is safety gear. A pair of safety glasses is non-negotiable to protect your eyes from flying plastic shards or stray drops of glue. Next, you’ll need cutting tools. A high-quality hobby knife with replaceable blades is perfect for precision cuts and trimming. For separating tougher parts, a small hobby saw or a pair of flush-cut pliers will be invaluable. A self-healing cutting mat is also a must-have to protect your work surface. For assembly, you’ll need a variety of adhesives. A fast-acting super glue (cyanoacrylate) is great for quick bonds, while a two-part epoxy provides a much stronger, more permanent hold for major structural joints. To refine shapes and smooth connections, invest in a set of small files and some sandpaper of various grits. A pin vise, which is a small hand drill, is excellent for creating holes to peg joints together for added strength. As you advance, you might consider tools like a rotary tool (such as a Dremel) for grinding and cutting, but the basics will carry you through your first several creations.
Principles of creature and character design
Having a vast library of parts and a full toolkit is one thing; knowing how to combine them into a cohesive and compelling new figure is another. This is where the principles of design come into play. Before you glue anything, take time to ‘dry fit’ your pieces. Lay them out and experiment with different combinations. The most important element to consider is the silhouette. A character with a strong, recognizable silhouette will be visually interesting even from a distance. Think about creating a dynamic pose or an unusual shape. Balance is also crucial, both physically and aesthetically. Your creation should be able to stand on its own, and its visual elements should feel distributed in a pleasing way. A massive upper body might need larger legs or a tail to feel balanced. Think about the ‘story’ of your character. Is it a heroic warrior, a clunky robot, or a mystical beast? Let that story guide your choices. Combining parts from a dragon, a tank, and a sci-fi soldier could create a formidable ‘bio-mechanical dragon hunter’. Pay attention to scale and texture. Mixing smooth, sleek parts with rough, weathered ones can create fantastic contrast. Don’t be afraid to be bold and experiment. The goal isn’t to create something that looks like it came from a factory; it’s to create something that came from your imagination.
Product Recommendation:
- Kids Tool Set, Tools for Kids with Toy Drill, Toddler Tools with Tool Box and Vest, Toy Tools for Toddlers 3-5
- JOYIN Dinosaur Toys with Activity Play Mat & Storage Cage, 19 PCS Realistic Dinosaur Figures & Trees for Toddlers Kids Ages 3-5, Ideal for Boys and Girls Gift
- Cool 8 Wheels Hand Controlled rc Stunt Car Toys, Gesture Sensing Remote Control Cars for Boys Age 6 7 8-12 13 14 Year Old, Birthday Gifts Ideas for Kids
- masterbee Kid Camera Instant Print Photo, Birthday Gifts for Girls and Boys, Kids Digital Camera Toys, 1080P HD Video, 3 4 5 6 7 8 9 10 11 12 Year Old Boy Gifts/Girl Gifts
- Remote Control Dinosaur, Realistic Dinosaur Toys for Kids 3-5, 2.4GHZ, Walking,Rechargeable, 3D Eyes, 3 Sound Effects, Demo Function, Jurassic Toys for Christmas, Kids 3+
The assembly line From planning to execution
Once you have a design you’re excited about, it’s time for assembly. This phase requires patience and precision. Begin by preparing your parts. If you’re joining two pieces, make sure the surfaces that will connect are flat and clean. You may need to sand or file them down for a perfect fit. This ‘dry-fitting’ process is critical; ensure everything aligns as you want it before any glue is applied. For major structural connections, like attaching limbs to a torso, consider ‘pinning’ the joint for strength. This involves drilling a small hole in both parts with your pin vise, inserting a small piece of metal wire (a cut paperclip works well), and then applying glue. This creates a much more durable bond than glue alone. When you’re ready to glue, apply the adhesive sparingly. Too much glue can ooze out and ruin surface details. For super glue, a small drop is often enough. For epoxy, mix only what you need and apply it carefully with a toothpick or small spatula. Sometimes, you’ll have gaps between parts. These can be filled with modeling putty or epoxy putty. Apply the putty to the gap, smooth it with a sculpting tool or a wet finger, and let it cure completely before sanding it flush with the surrounding surfaces. Work methodically, one joint at a time, and allow each bond to fully cure before moving on to the next. This careful process ensures your creation will be solid and ready for painting.
Painting and finishing your masterpiece
Painting is the magical final step that unifies all the disparate parts into a single, cohesive character. A great paint job can truly bring your creation to life. The first and most important step is priming. A primer is a special type of paint that prepares the surface for the color coats. It helps your paint adhere better and provides a uniform base color, which is crucial when you’ve combined plastics of many different colors. Use a spray primer designed for models or miniatures, applying it in thin, even coats. Once the primer is dry, you can begin applying your base colors. It’s best to use acrylic hobby paints, as they are non-toxic and clean up with water. Apply thin layers of paint, allowing each to dry completely before applying the next. This prevents obscuring the fine details of your model. After your base colors are on, you can add depth and detail. A ‘wash’, which is very thin, dark paint, can be applied over the model to settle into the recesses and create shadows. ‘Dry brushing’, which involves using a brush with very little paint on it to lightly brush over the raised surfaces, is a great technique for highlighting edges and textures. Finally, once you are happy with your paint job, protect it with a sealant. A matte or satin varnish spray will protect the paint from chipping and give your creation a professional finish.
Showcasing your creations and joining the community
Creating your toy mashup is an incredibly rewarding process, and sharing it with others can be just as fun. You’ve made a unique piece of art, so give it the spotlight it deserves. Good photography can make a huge difference. You don’t need a fancy camera; a smartphone will do. Find a neutral background, like a plain wall or a sheet of paper, and use good, diffused lighting. Natural light from a window is often best. Take photos from multiple angles to show off all the details and the dynamic silhouette you worked so hard to create. Once you have your photos, share them online. Platforms like Instagram, Pinterest, and Reddit are home to vibrant communities of custom toy makers and kitbashers. Use relevant hashtags like #toymashup, #kitbash, #customtoy, #upcycledtoys, and #toyart to help others find your work. Engaging with these communities is a fantastic way to get feedback, find inspiration for your next project, and connect with fellow creators. Don’t be shy about posting your first creation; the community is generally very supportive and encouraging of newcomers. Sharing your work not only celebrates your creativity but also inspires others to look at their own broken toys and see a world of possibility.
In conclusion, the practice of toy mashing is a powerful testament to the enduring power of creativity. It transforms the end of a toy’s life into a spectacular new beginning. By following the path from salvage to final showcase, you do more than just build a new toy; you develop skills in design, sculpting, and painting. You engage in a deeply sustainable act, reducing waste by giving new purpose to what would otherwise be thrown away. Each creation is a unique statement, a character born from your imagination and built with your own hands. You’ve learned how to assemble a parts library, use the essential tools of the trade, apply design principles, and bring it all together with skilled assembly and a vibrant paint job. So look again at that box of broken bits. It is not a graveyard. It is an incubator of ideas, a treasure chest of potential waiting to be unlocked. Your first masterpiece is in there, waiting for you to build it.