
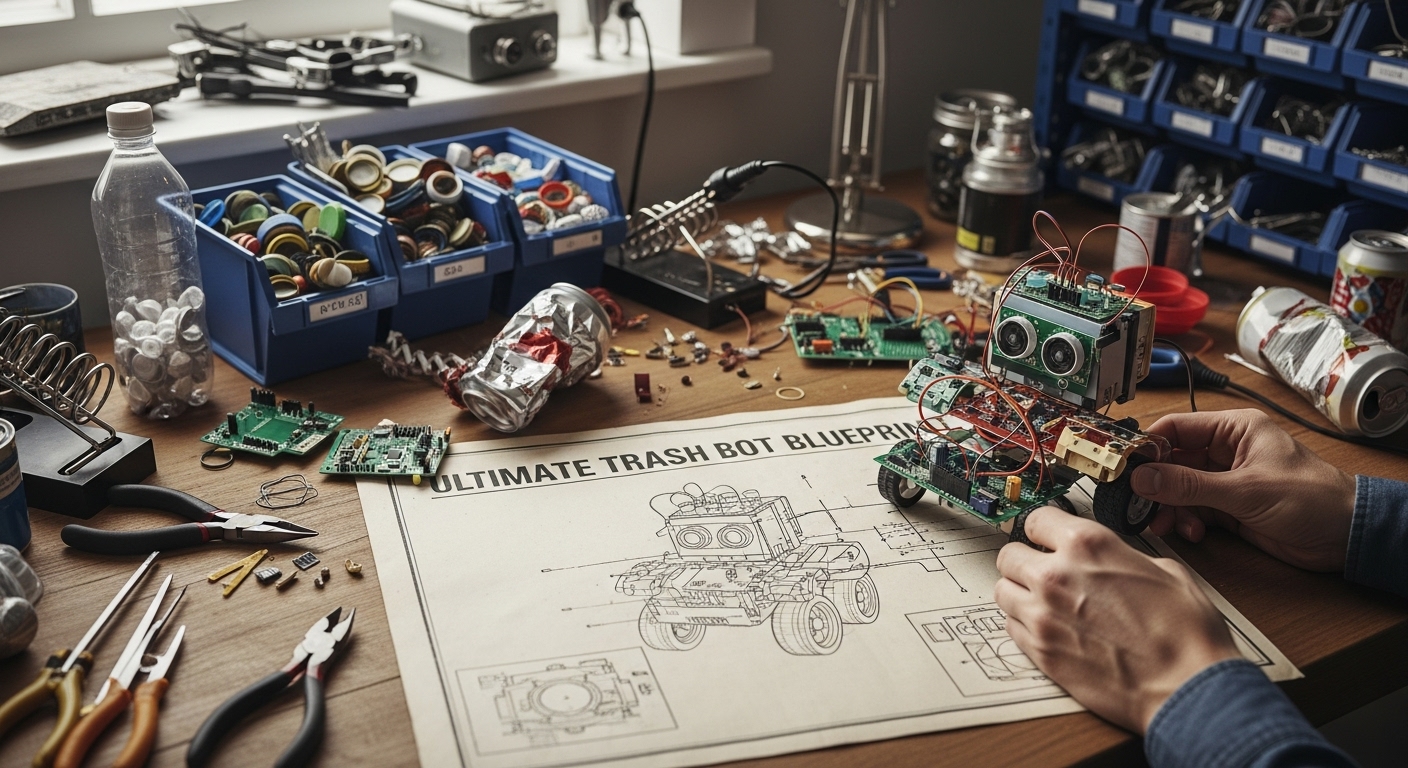
Have you ever looked at a pile of recycling and seen not just trash, but treasure? A plastic bottle could be a torso, a bottle cap a wheel, and a tangle of old wires the start of a nervous system. This is the magic of building trash bots. In a world increasingly focused on sustainability and hands-on learning, the art of creating amazing robots from household junk has exploded in popularity. It’s more than just a craft; it’s an entry point into engineering, design, and environmental consciousness. This isn’t about expensive kits or complicated coding. It’s about ingenuity, creativity, and the thrill of bringing an inanimate object to life using things you were about to throw away. This guide is your ultimate blueprint. We will walk you through the entire process, from hunting for materials in your own home to assembling the essential tools, building your very first moving robot, understanding design principles, and finally, giving your creation a unique and vibrant personality.
The art of treasure hunting in your recycling bin
The first step in any great trash bot adventure is the hunt for materials. Your home is a goldmine of potential robot parts. Before you toss that yogurt cup or cardboard box, look at it with a new set of eyes. Think about structure, texture, and potential function. The best junk bot builders become expert scavengers. Start by setting up a dedicated ‘bot parts’ box. The best items are often sturdy but easy to work with. Cardboard from shipping boxes and food packaging is fantastic for creating frames and bodies. Plastic bottles of all shapes and sizes make excellent torsos, heads, or even rocket boosters. Don’t forget smaller items; bottle caps are perfect for wheels, eyes, or decorative gears. Old CDs and DVDs have a futuristic shine and can be used for bases or large wheels. Straws, coffee stirrers, and wooden skewers are great for creating limbs or axles. Even the humble toilet paper roll has immense potential as a robotic arm or leg segment. Look beyond the obvious too. Old, broken electronic toys are a jackpot. They often contain small DC motors, wires, battery compartments, and switches that are the key to making your bot move. Always remember to thoroughly clean and dry any food containers before adding them to your collection to keep your workshop tidy and your creations fresh.
Assembling your essential junk bot toolkit
Once you have a growing collection of materials, you’ll need the right tools to bring them together. You don’t need a professional workshop; a few basic items will be more than enough to get you started on your trash bot journey. The most important tool in your arsenal will be a reliable adhesive. A hot glue gun is the champion of junk bot construction. It creates strong bonds quickly and works on a wide variety of materials like plastic, cardboard, and wood. However, always remember that hot glue guns are, as the name implies, very hot. Adult supervision is an absolute must if children are involved. For more precise connections or temporary holds, a roll of strong tape, like duct tape or packing tape, is invaluable. To shape and cut your materials, you’ll need a good pair of scissors for cardboard and thin plastic, and a craft knife for more detailed cuts or thicker materials. Again, safety is paramount, so an adult should always handle the craft knife. A set of permanent markers, paint pens, or even old nail polish is essential for adding color and detail. Finally, for the electronics, you might need a simple pair of wire strippers and some electrical tape to safely connect your motors and batteries. Having these basic tools on hand will make the building process smoother, safer, and much more enjoyable, allowing you to focus on the creative challenge of building your robot.
Building your first moving trash bot the vibrobot
Ready to make something move? The best first project is a ‘vibrobot’, a simple creation that buzzes and skitters across a flat surface. It’s a fantastic introduction to basic circuits and motor mechanics. The heart of the vibrobot is an unbalanced motor. You can salvage a small DC motor from an old toy, like an electric toothbrush or a remote control car. To make it vibrate, you need to add an off-center weight to its spinning shaft. A small dab of hot glue, a piece of an eraser, or even a small nut glued to the shaft will work perfectly. When the motor spins, this uneven weight will cause it to wobble violently. Now, you need a body. The head of an old toothbrush or a small, lightweight plastic cup turned upside down works great. Attach your battery pack, typically one or two AA batteries, to the top of your bot’s body with hot glue or tape. Then, connect the wires from the battery pack to the two metal tabs on your motor. If you want, you can add a simple switch in between one of the wires to turn your bot on and off easily. Once the motor is connected, use another dab of hot glue to secure it to the body. Place your new vibrobot on a smooth floor, connect the final wire, and watch it go. It will vibrate, spin, and move in unpredictable, hilarious ways. This simple success is a huge confidence booster and the perfect stepping stone to more complex designs.
Product Recommendation:
- View Master Mickey Mouse Deluxe Set, Disney 100 Edition – STEM, Retro, Fun Learning Toy for Kids and Adults, Toddlers, Ages 3+
- Spidey and His Amazing Friends 3-Pack, 4-Inch Scale Marvel Action Figures, Includes 3 Figures and 3 Accessories, Spider-Man, Ghost-Spider & Miles Morales (Amazon Exclusive)
- Nerf Vortex Aero Howler Foam Ball, Classic Long-Distance Football, Flight-Optimizing Tail, Whistling Sound, Indoor & Outdoor Fun, Christmas Stocking Stuffers for Kids
- Deejoy Tool Set with Tool Box & Electronic Toy Drill, Pretend Play Kids Construction Kits for Kids Ages 3-5 Years Old, Toddler Boy Toys(Orange)
- NATIONAL GEOGRAPHIC Glowing Marble Run – Construction Set with 15 Glow in The Dark Glass Marbles & Storage Bag, STEM Gifts for Boys and Girls, Building Project Toy (Amazon Exclusive)
Principles of bot design form follows function
After building a simple vibrobot, you might be ready to design something with more intention. This is where you start thinking like an engineer. The principle of ‘form follows function’ is key. What do you want your robot to do? Even if it’s just ‘look cool and stand up straight’, that’s a function. Let’s start with stability. A robot with a low center of gravity will be less likely to fall over. This means putting heavier components, like batteries or a large motor, closer to the base. If your bot is tall and skinny, you might need to give it wide feet, perhaps made from plastic lids, to keep it stable. Next, consider locomotion. How will it move? If you’re not using a vibration motor, you’ll need wheels or legs. Bottle caps are classic wheel choices. You can poke a hole through the center and use a wooden skewer or a piece of a plastic straw as an axle. Getting two wheels to spin with one motor can be tricky but can be achieved with rubber bands acting as a belt drive. Creating legs that walk is much more advanced, but you can create posable, static legs from sturdy cardboard or plastic cutlery. The structure itself is also important. A strong frame is the skeleton of your robot. Corrugated cardboard is excellent for this, as it’s light but rigid. You can build a simple box chassis and attach all your other components to it. Thinking through these elements before you start gluing will save you a lot of frustration and result in a more robust and impressive final product.
Giving your creation a personality
A robot is more than just a collection of parts; it’s a character waiting to be discovered. This is the part of the process where your inner artist gets to play. The simplest way to inject personality is with eyes. A pair of googly eyes, which you can get from any craft store, instantly brings a bot to life. You can also draw eyes with markers or use small bottle caps. The expression you give your bot says a lot. Is it a happy helper? A grumpy guard bot? A curious explorer? Think about a head. A small plastic container, an old lightbulb (the plastic LED kind, not glass), or a simple cardboard box can serve as a head. Add antennae made from pipe cleaners or pieces of wire. Maybe your bot has a mouth made from a drawn line or a piece of red tape. Color is also a powerful tool. Use markers, paint, or colored tape to give your bot a unique color scheme. Does it have racing stripes? Camouflage? A bright, friendly yellow coat? Don’t forget a name and a backstory. Is this ‘Scrappy’, the bot who collects lost screws? Or ‘Commander Clank’, the leader of the junk bot army? Creating a story for your robot makes it more than just a toy; it makes it a companion. This step is crucial because it connects the technical engineering side of the project with the boundless creativity of play, which is the true spirit of building with junk.
Taking your trash bot to the next level
Once you’ve mastered the basics, there are countless ways to make your trash bots more complex and capable. The next logical step is control. Instead of having a motor that’s always on, you can introduce a simple switch. You can salvage one from an old electronic device or buy a cheap one online. This allows you to turn your bot on and off without disconnecting wires. For a bigger challenge, try using multiple motors. You could have one motor for each wheel, allowing your bot to turn. This requires a more complex wiring setup, but the payoff in maneuverability is huge. Think about adding articulated limbs. Using paper fasteners (brads) as joints, you can create arms and legs that can be posed. You could even try to connect them to a motor with a system of levers made from craft sticks to create simple movements. Another exciting avenue is alternative power. Try salvaging a small solar panel from a broken garden light. On a sunny day, this panel might be able to power a small motor directly, creating a solar-powered trash bot. You can also explore adding lights. Simple LEDs are easy to wire into your existing battery circuit and can give your robot glowing eyes or indicators. The key is to build on your skills incrementally. Each new component you add, from a switch to a second motor, is a new learning experience. Don’t be afraid to experiment, fail, and try again. That’s how you’ll go from a simple vibrobot to a truly amazing piece of junk bot engineering.
The journey from a pile of recycling to a buzzing, blinking robot is a truly rewarding one. We’ve explored how to become a master scavenger, gathering the perfect parts from household waste. We’ve assembled the simple toolkit needed to cut, shape, and bind your creations. You’ve learned how to build your first moving vibrobot, a project that provides instant gratification and a solid foundation in simple circuits. From there, we delved into the principles of design, considering stability and locomotion to build more robust bots. We saw how a few simple additions like googly eyes and a creative backstory can give your robot a soul, transforming it from a machine into a character. Finally, we looked ahead to the next steps, like adding switches, multiple motors, and even solar power. Building trash bots is a powerful lesson in resourcefulness and problem-solving. It proves that with a little imagination and a dab of hot glue, the potential for creation is all around us. It’s a hobby that is kind to the planet and endlessly engaging for the mind. So go ahead, look at that empty plastic bottle on your counter, and ask yourself what it wants to become. The ultimate blueprint is now yours.