
Unlock the secret to a truly flawless, sculpted complexion with underpainting, a revolutionary makeup technique transforming beauty routines worldwide. No longer just a professional artist’s trick, underpainting has surged in popularity, becoming the go-to method for achieving a naturally defined look without visible harsh lines. This innovative approach involves applying contour, highlight, and blush before your foundation, allowing these defining elements to peek through subtly, creating an ethereal glow from within. It is a game-changer for anyone seeking that coveted ‘second skin’ finish, a hallmark of modern beauty trends.
The beauty industry buzzes with this technique, celebrated for its ability to deliver depth and dimension while maintaining a soft, seamless appearance. Unlike traditional contouring, which can sometimes appear stark or overly dramatic, underpainting offers a more diffused, integrated effect. It is about enhancing your natural bone structure in a way that looks effortless, almost as if you woke up with perfectly chiseled features. This article will guide you through the underpainting revolution, covering everything from its historical roots to essential tools, step-by-step application, and advanced tips for a truly perfected finish.
Understanding Underpainting’s Undeniable Appeal
Underpainting, while seemingly a fresh trend, draws inspiration from artistic principles centuries old, where artists layered colors to create depth and luminosity. In makeup, this technique has gained immense traction recently due to its ability to create a soft-focus, airbrushed effect that feels incredibly modern and relevant. The core appeal lies in its subtlety; by placing contour and highlight products beneath your base makeup, you ensure a blend that is truly undetectable. This method prevents the ‘painted on’ look, instead offering a dimension that appears to emanate from beneath the skin’s surface. It is particularly favored by those who desire a more natural, ‘no makeup’ makeup look but still wish to enhance their facial structure.
The technique also addresses a common frustration with traditional contouring, namely the difficulty in blending harsh lines. When applied under foundation, the base product acts as a natural diffusing agent, softening edges and creating a harmonious transition between shades. This results in a more forgiving application process, making it accessible even for makeup novices. Furthermore, underpainting contributes to the longevity of your sculpted look. With the contour and highlight essentially ‘locked in’ by the foundation layer, your definition is less likely to smudge or fade throughout the day. It represents a shift towards intelligent layering, prioritizing a seamless, long-lasting finish that feels both sophisticated and surprisingly simple to master.
Essential Tools and Products for Underpainting Success
Achieving underpainting perfection hinges on selecting the right tools and products. For contour, cream or liquid formulas are paramount. They blend seamlessly into the skin and are easily diffused by subsequent layers of foundation. Look for shades that are cool-toned and mimic natural shadows, avoiding anything too warm or orange. Popular choices include cream contour sticks, liquid bronzers, or even a foundation shade a few tones deeper than your natural complexion. For highlighting, cream or liquid illuminators are ideal. These should have a subtle sheen, not glitter, to create that coveted ‘lit from within’ glow. Avoid powder highlights at this stage, as they can create a patchy finish when layered under liquid foundation.
Blush also plays a crucial role in underpainting, adding a flush of color that appears to emanate from beneath the skin. Cream or liquid blushes are the best option, offering a natural, dewy finish. Choose shades that complement your skin tone, from soft peaches to rosy pinks. Application tools are equally important. Dense, synthetic brushes or damp beauty sponges work wonders for blending cream and liquid products. A smaller, more precise brush might be useful for contour placement, while a larger, fluffier brush or sponge ensures a smooth blend for highlight and blush. Remember, the goal is effortless blending, so invest in tools that facilitate a seamless and streak-free application of these foundational products.
The Core Technique Layer by Layer
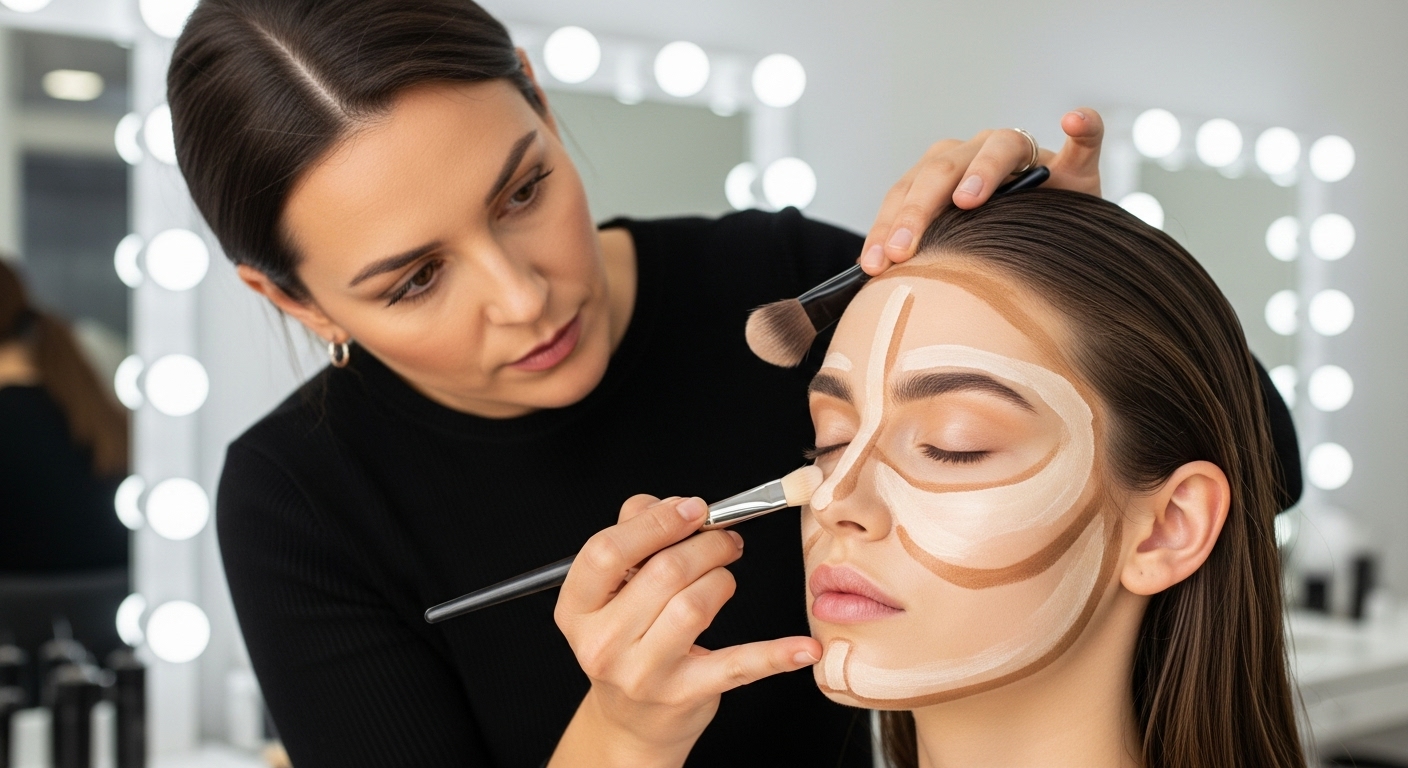
Mastering underpainting involves a specific application order that builds dimension strategically. Begin with a well-hydrated, primed face. First, apply your cream or liquid contour. Identify the areas you want to recede or define, such as the hollows of your cheeks, along your jawline, and perhaps the sides of your nose. Use a precise brush or stick to apply the product in thin, controlled lines. The key here is not to over-apply; a little goes a long way. Blend these contour lines immediately with a damp beauty sponge or a dense contour brush, ensuring there are no harsh edges. The blend should be soft and diffused, creating a natural shadow.
Next, move on to your cream or liquid highlight. Apply this to the high points of your face where light naturally hits—think cheekbones, brow bones, the bridge of your nose, and your cupid’s bow. Again, blend thoroughly with a clean section of your sponge or a separate brush. The highlight should lift and brighten these areas subtly. Finally, dot your cream or liquid blush onto the apples of your cheeks and blend upwards towards your temples. This adds a healthy, youthful flush. Once all your defining layers are blended, apply a thin, even layer of your preferred liquid or cream foundation over your entire face. Gently pat and press the foundation rather than swiping, to avoid disturbing the underpainted layers. The foundation will act as a veil, subtly softening and unifying the sculpted areas, revealing a naturally defined and radiant complexion.
Featured Products for a Flawless Finish
Discover our top picks to perfect your underpainting technique. From creamy contour sticks to luminous liquid highlighters, these products are designed for seamless blending and long-lasting wear. Elevate your makeup game today!
- Sculpt & Define Cream Stick: Effortless application, natural shadow.
- Radiance Liquid Illuminator: Luminous glow, never glittery.
- Dewy Flush Liquid Blush: Buildable color, fresh complexion.
- Pro Blending Sponge Set: Seamless finish, streak-free application.
Click here to explore our full collection and achieve your best sculpted look!
Tailoring Underpainting for Your Unique Face Shape
While the basic principles of underpainting remain consistent, adapting the placement of your contour and highlight to your specific face shape can dramatically enhance your results. For those with a round face, the goal is to create more angularity and length. Apply contour along the outer edges of your forehead, under your cheekbones extending towards the corners of your mouth, and along the jawline. Highlight the center of your forehead, the bridge of your nose, and the center of your chin to draw the eye vertically. If you have a square face, soften strong angles by contouring the temples, the corners of your jaw, and lightly under the cheekbones. Highlight the center of your forehead, under your eyes, and the chin to bring forward and round out features.
An oval face is often considered balanced, so underpainting aims to enhance rather than reshape. Contour lightly under the cheekbones and along the temples. Highlight the center of the forehead, under the eyes, and on the chin for a subtle lift. For a heart-shaped face, which typically has a wider forehead and a narrower chin, focus your contour on the temples and under the cheekbones to balance the width. Apply highlight to the chin and under the eyes to bring forward the lower half of the face. Understanding your unique bone structure allows for strategic application, ensuring your underpainting truly celebrates and enhances your natural beauty, making the technique truly customized to you.
Troubleshooting Common Underpainting Mistakes
Even with the best intentions, common pitfalls can occur when mastering underpainting. One frequent issue is applying too much product initially. Remember, underpainting thrives on subtlety. Start with a minimal amount of product and build up if necessary. Over-application can lead to a muddy or patchy appearance, especially once foundation is applied over the top. Another common mistake involves insufficient blending. The success of underpainting relies entirely on seamless transitions. Harsh lines will be visible through your foundation, defeating the purpose of the technique. Dedicate ample time to blending each product thoroughly before moving to the next step. Using a damp sponge or a soft brush and gentle patting motions can significantly improve blend quality.
Choosing the wrong shades also presents a challenge. Contour shades that are too warm or orange will look unnatural and dirty, rather than creating a true shadow. Opt for cool-toned, ashy browns for contour. Similarly, a highlight that is too glittery or a blush that is too vibrant can overwhelm the subtle effect of underpainting. Select creamy, natural-looking highlighters and blushes. Finally, applying foundation with a swiping motion can disturb the meticulously blended underlayers. Instead, use a gentle patting or stippling motion with your foundation brush or sponge. This presses the foundation into the skin without dragging or picking up the underpainted products, preserving your sculpted masterpiece. Patience and practice will refine your technique and help you avoid these common missteps.
Advanced Underpainting for Specific Effects
Once you are comfortable with the basic underpainting technique, you can explore advanced applications to achieve specific desired effects. For a more lifted appearance, focus your contour higher on the cheekbones, blending upwards towards the temples. Apply highlight to the outer corners of your eyes and above the tail of your brows to create an elevated look. This method is particularly effective for creating the illusion of a more youthful, taut complexion. If your goal is a ‘snatched’ jawline, extend your contour slightly down the neck, blending meticulously to create a seamless transition. This adds extra definition and can visually slim the lower face.
For those seeking an intensely radiant, almost glass-skin effect, consider mixing a drop of liquid illuminator directly into your foundation before applying it over the underpainted layers. This provides an all-over luminosity that enhances the targeted highlight areas. Another advanced tip involves ‘spot underpainting’ for specific concerns. For example, if you wish to minimize a double chin, apply a small amount of contour directly underneath the chin and blend downwards before your foundation. Or, to make lips appear fuller, lightly contour just below the center of your lower lip line. These precise applications allow for highly customized results, taking your underpainting skills to a truly professional level and demonstrating the versatility of this incredible method.
The underpainting revolution has truly redefined how we approach makeup, offering a sophisticated yet accessible path to a sculpted, natural-looking complexion. This technique, rooted in artistic principles but refined for modern beauty, allows for an effortless blend of dimension and luminosity that feels inherently organic. By layering contour, highlight, and blush beneath your foundation, you achieve a seamless finish that enhances your natural features without visible makeup lines, delivering that coveted ‘second skin’ effect. The emphasis on cream and liquid products, combined with meticulous blending, ensures a long-lasting, radiant look that adapts beautifully to any face shape.
Embracing underpainting means moving towards a more thoughtful and integrated makeup application, prioritizing subtlety and natural radiance over heavy layers. It is a testament to the idea that true beauty lies in enhancement, not concealment. As we continue to see beauty trends lean towards authenticity and effortless elegance, underpainting stands out as a timeless skill worth acquiring. Practice is key; with each application, you will refine your technique and discover the perfect balance for your unique features. Step into this revolution, experiment with the placement, and unlock the transformative power of underpainting for a truly perfected appearance that glows from within.